
5 min. read
Encrypted resource metadata is now available on Passbolt Cloud.
Passbolt Cloud now encrypts resource metadata and has new capabilities like custom icon & colors, multi-URI, custom fields, standalone notes, and more.

You want to talk directly to the passbolt API, maybe to automate user onboarding, secrets synchronization or just to flex? Then you stumble upon JWT authentication and think: “Alright, I’ll just use POST /login with the credentials and get a token”
Not too fast. Passbolt does JWT a bit differently because we care about security and cryptographic elegance.
This article walks you step by step through how JWT authentication works in passbolt. No black magic, no confusion, just a bit of OpenPGP wizardry.

First thing first, we need to say hello to the server in a language that it understands. That “hello” is a challenge, a JSON payload that looks like that:
{
  "version": "1.0.0",
  "domain": "{{API_BASE_URL}}",
  "verify_token": "e5bbc6da-22eb-43c4-82b3-137f47577766",
  "verify_token_expiry": 1741771173
}
It includes:
Think of it as your API handshake invitation e.g., a little note saying “Hey, I’m me and I want to authenticate”.
Now that you’ve got your challenge, it’s time to encrypt it so only your passbolt server can read it and sign it, so it knows it really came from you.
Most of the time, you’ll want to use JWT authentication if you are building your own script, tool or integration that needs to talk with the passbolt API. In other words: If you’re writing code that needs to authenticate without going through the web UI, JWT is your gateway, and whether you’re coding in PHP, Python, Go, Node.js , Bash (or even Rust), the logic is always the same. We’ll use CLI examples but the same logic applies if you’re doing it programmatically.
What you’ll need is:
Then, encrypt the challenge using the server’s public key for encryption and your private key for signing. But Antony, why do I need both? Encryption ensures confidentiality, signing ensures authenticity.
Let’s see how this actually looks when you do it. I'll do that on the GPG command line because I am an old man (28 years old…) but again, the same logic applies in any language through its OpenPGP library. Let’s re-use the challenge we built above and assume it’s stored as challenge.json
gpg --armor \
    --recipient "[email protected]" \
    --local-user "[email protected]" \
    --sign \
    --encrypt \
    --output challenge.asc \
    challenge.json
You should have a file named challenge.asc that is a PGP message. That’s exactly what you’ll send to the API.
We got our challenge that is encrypted and signed, it’s time to send it to the passbolt server so it can prove you’re who you say you are.

Send the challenge in payload using POST /auth/jwt/login.json, the payload should also include your user_id:
{
  "user_id": "{{USER_ID}}",
  "challenge": "-----BEGIN PGP MESSAGE-----"
}
f you don’t know your user_id, there is one easy way to find it: In the web interface, navigate to Manage Users & Groups and click on your name in the user’s column. The URL should be /app/users/view/{{USER_ID}}
When you send this request, the passbolt server will:
⚠️ If something fail here, either double-check that the message was signed with the same private key linked to your user_id you used and that the JWT authentication plugin is enabled. This can be double-checked on the server using ./bin/cake passbolt healthcheck –jwt
When the server replies, you’ll get another encrypted message in the body.challenge object, for the example we’ll copy the content of that into a file called server-response.asc and decrypt it with our user’s private key:
gpg --decrypt server-response.asc > decrypted.jsonYou should see something like:
{
  "access_token": "eyJhbGciOiJIUzI1NiIsInR5cCI6IkpXVCJ9...",
  "refresh_token": "b3ffec6f-9a02-4825-913e-3a82e6974b23"
}
That’s it! You made it. The encryption, the signing, the decryption… All that hard work has finally paid off. Inside your decrypted file, you should now see your two shiny new friends. Your access_token lets you perform authenticated requests and your refresh_token allows you to renew it when it expires.
You didn’t go through all those steps for nothing right? Now, let’s use the access_token. For all the API requests, you should use the access_token as follow:
curl --request GET \
  --url {{API_BASE_URL}}/resources.json \
  --header "Authorization: Bearer {{ACCESS_TOKEN}}"
That’s it. You’re officially talking to the passbolt API as an authenticated user. I believe that if it works, you’ll feel like a hacker in a 90s movie (probably with a fewer sunglasses though)
When your access_token eventually expires (because you know, good security hygiene never sleeps), you don’t need to start all over…

curl --request POST \
  --url {{API_BASE_URL}}/auth/jwt/refresh.json \
  --header "Content-Type: application/json" \
  --data '{
    "user_id": "{{USER_ID}}",
    "refresh_token": "{{REFRESH_TOKEN}}"
  }'
The server will reply with a new access_token and sometimes even a new refresh token. Just think of it as passbolt’s API saying: “Sure, you can stay logged in a bit longer, but behave.”
Keep both tokens safe. The access_token opens the door, but the refresh_token keeps the door unlocked. If someone gets hold of it, they can renew their access forever (not ideal if that someone isn’t you right?) Just treat those tokens like your toothbrush: Don’t share them and replace them once in a while.
So we created a challenge, encrypted and signed it, sent it to passbolt, decrypted the server’s response and used those tokens to finally talk with the API like a wizard. At first, it might feel like a lot of ceremony but there’s a reason behind it. This process guarantees that both you and the server are who you claim to be, without ever exchanging passwords. It’s security done right, with a bit of style.
If you ever see someone saying “Passbolt’s JWT flow is weird”, you can now smile and reply: “It’s not weird, it’s just ✨classy ✨”
If you’d like to see how this works in a complete example script, I wrote an example implementation that includes tons of comments to understand the workflow of every call and that follows exactly the same steps shown here. Just check it out, here!
5 min. read
Passbolt Cloud now encrypts resource metadata and has new capabilities like custom icon & colors, multi-URI, custom fields, standalone notes, and more.
4 min. read
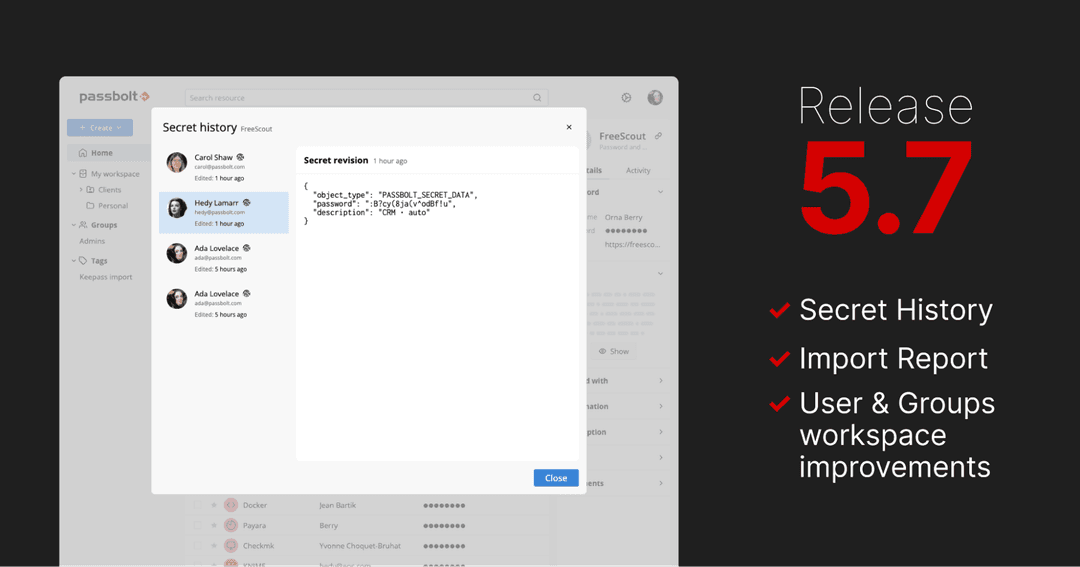
Expand secret history, improved user and group management and a detailed import summary report.