3 min. read
📦 Passbolt debian package
We know, Installing passbolt is a quite hot topic. You just need to go in the community forum to realize
An aspect of Passbolt that is less known is probably its versatility. Passbolt has been built to be lightweight and installable on a wide choice of environments. In this document, we will explore how to install and run Passbolt CE on a RaspberryPI embedded board.
This article will guide you through the steps to get Passbolt up and running on the RaspberryPI Zero. The same recipe is valid for any other Linux Debian distributions running on other systems. At the end of this article you should have:

One of the recent tasks at Passbolt has been the creation of a Debian package to make it easier, friendlier and fun to both run Passbolt Community, or deploy Passbolt Professional editions. At the same time making it a lot easier to install it across Linux Debian based systems.
There are currently two versions of Passbolt available: CE — Community Edition, and PRO — paid, supported version. This document will address the former: Passbolt CE.
Just for the sake of having some more fun, I have decided to use a RaspberryPI Zero to run Passbolt on. The board size, low power consumption and performance — running at 1GHz, makes it a good enough choice to evaluate Passbolt, and experiment with it.
At the same time, it could well be a solution for small teams to use in real case scenarios. Sharing passwords to access resources used collectively on the network, especially now that remote working seems to gradually become more necessary than ever before.
Storing this sensitive information on a locked-down, small, networked device is also an affordable and secure choice, as we will unfold in the next following sections. So, sit back, relax, and keep reading!
These are the several parts you will need to put this to work:
That’s pretty much it! Needless to say that any other RaspberryPI model will work, just skip the wireless setup section if you network the board through Ethernet.
The choice I made for the operating system in this case is Raspbian Lite, for a number of reasons: It is perhaps the most popular and well supported OS on the net. It runs headless, which is precisely what we need — Passbolt is 90% web driven. It is also pretty easy to connect it to the network from the first boot. And last but not least, it is trivially easy to enable ssh access to it, should we need to.
Download Raspbian Lite following the official guidelines. Burn it into the SDcard. Then set the wireless network connection and enable ssh as explained below:
On the SDCard FAT partition, create an empty file named ssh. Then create a file named wpa_supplicant.conf with the following contents:
country=GB
ctrl_interface=DIR=/var/run/wpa_supplicant GROUP=netdev
update_config=1
network={
  ssid=”mywireless”
  psk=”mypassphrase”
  id_str=”home”
}
Replace ssid and psk with your wireless network details. Once you boot it up. You should now be able to ssh into the PiZero: ssh [email protected], password: raspberry.
In order to have a complete Passbolt setup, we need a way to send and receive emails. We will install postfix on the PiZero as an MTA which will use Google Mail as a relay agent to send emails to the outside world.
Ssh into the PiZero, user “pi” password “raspberry”:
$ sudo apt-get update
$ sudo apt-get install postfix libsasl2-modules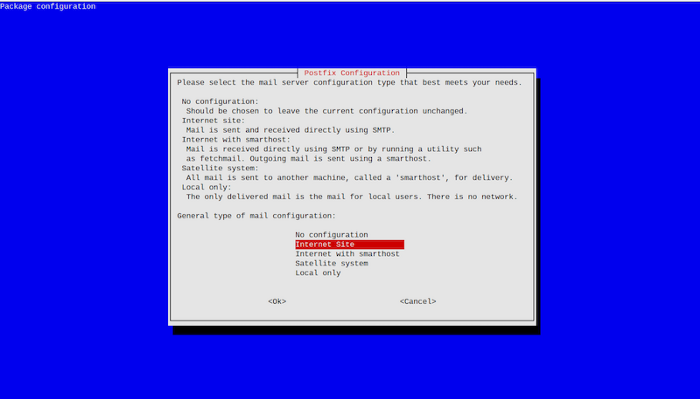
During the installation, make sure to select “Internet site” when prompted to choose mode.
Edit the configuration file with “sudo nano /etc/postfix/main.cf” and add the snippet below at the end of the file.
# This tells Postfix to hand off all messages to Gmail, never do direct delivery.
relayhost = [smtp.gmail.com]:587
# This tells Postfix to provide the username/password for Gmail.
# Enable SASL authentication
smtp_sasl_auth_enable = yes
# Disallow methods that allow anonymous authentication
smtp_sasl_security_options = noanonymous
# Location of sasl_passwd
smtp_sasl_password_maps = hash:/etc/postfix/sasl/sasl_passwd
# Enable STARTTLS encryption
smtp_tls_security_level = may
# Location of CA certificates
smtp_tls_note_starttls_offer = yes
smtp_tls_CAfile = /etc/ssl/certs/ca-certificates.crt
Comment the line “relayhost=” which might sit above these lines. Now let’s set the credentials for Postfix to authenticate correctly with Google Mail. “sudo nano /etc/postfix/sasl/sasl_passwd”, to add this line:
smtp.gmail.com [email protected]:mygmailpasswordFinally, execute the following commands
$ sudo chmod 600 /etc/postfix/sasl/sasl_passwd
$ sudo postmap /etc/postfix/sasl/sasl_passwd
$ sudo /etc/init.d/postfix restart
$ echo “Hello from Passbolt Pizero” | sendmail [email protected]
That’s it! You should receive an email at your Gmail account!
Passbolt has published a Debian repository which is located here. Follow these steps to register the repo on the PiZero:
$ sudo apt-get install certbot python3-certbot-nginx
$ sudo apt-key adv — keyserver keys.gnupg.net — recv-keys 0xDE8B853FC155581D
$ echo “deb https://download.passbolt.com/ce/debian buster stable” | sudo tee /etc/apt/sources.list.d/passbolt.list
$ sudo apt-get update
$ sudo apt-get install passbolt-ce-server
During the installation process, nginx and mariadb will be installed along with Passbolt. Be patient, this will take a while. At the end of the process, a series of dialogs will ask you for some crucial questions.
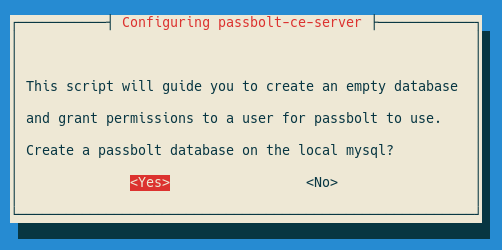
The screenshot above is the first one in a series of several SQL related questions. We should answer Yes here, and the next 2 screens will ask for the credentials to connect to mysql with administrator privileges. This will allow Passbolt to create the Passbolt database and administrator user account. Because we are installing mysql from scratch, answering the defaults will do the job.
The next 3 screens will ask you to provide the following: The new Passbolt database name, username and password for a new administrator for this database.
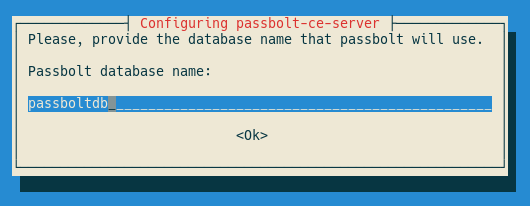
Accept all defaults, except for the Passbolt database password, just make up one. Remember it or note it down, you will need it later.
Next comes the nginx server setup:
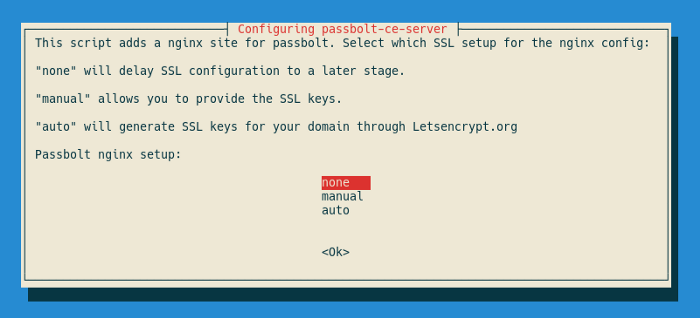
At this point we will choose none here — we will address secure https mode later on. By accepting the default domain (empty) passbolt installer will setup nginx to listen to any DNS name you route to the raspberry.
If you have the option to connect the Pizero behind your domain name, and you have obtained SSL certificates for it, you would select manual on this screen, provide the domain name and key files on the next 3 screens, and Passbolt would automatically setup nginx to run in https mode for you.

Since we choose none for this tutorial, the installation should now be complete. We will address https mode later on this article.
The installation should now be complete! Finally, remove the nginx default site, so that Passbolt will be reachable.
$ sudo rm /etc/nginx/sites-enabled/default
$ sudo /etc/init.d/nginx reload
Great! We are now ready to complete Passbolt installation!
For unattended install, please skip to the next section on this document.
Voila! Visit http://raspberrypi.local and go through the setup screens. Follow the documentation steps on the link below, starting at step 2: Configure Passbolt:
When you reach step 2.4: Mail Server (SMTP) make sure to set the following parameters:
We are telling Passbolt that we have a local mail server — Postfix we installed earlier, which will relay all Passbolt emails through Google Mail account we have set up earlier. Try to use the test section at the right of the screen to send a test email to your GMail account.
That’s it! Passbolt should now be up and running on your home network. You can either reach it through the browser extension, or directly through http://raspberrypi.local.
Taking one step further, you might consider sharing your PiZero Passbolt with your colleagues. Say you are part of a team member spread across the world. Or you are an active creator of a super cool project and you have other team members you need to share sensitive credentials to access common data remotely.
So how would you do that? Opening your home router port 80 to point to your Pizero IP address. Then make you public domain name point to your home router IP address.
Now, visit http://mydomain.com and you will reach Passbolt running on the PiZero. You can still access http://raspberrypi.local from within your internal network at the same time.
Enforcing Passbolt to run in https is a key feature that should be enforced whenever possible to guarantee a secure password database storage. Using non-secure http exposes login credentials over the network and invalidates the whole purpose of guaranteeing a strong security framework.
As we discussed earlier, the Passbolt package provides automatic configuration of nginx in https mode provided you have a domain name and SSL certificates. But there is also an additional mode called automatic, which allows to automate the setup process using letsencrypt, which we will cover now.
Since we have already installed Passbolt, we need to change the configuration. This is called package reconfiguration in Debian.
First, we need to make sure to forward not only port 80 as discussed above, but also port 443 for https, into the Pizero. Then we will do the steps below:
$ sudo dpkg-reconfigure passbolt-ceChoose No to mysql setup — since we have already done that. Then, choose auto when prompted on the following screen:
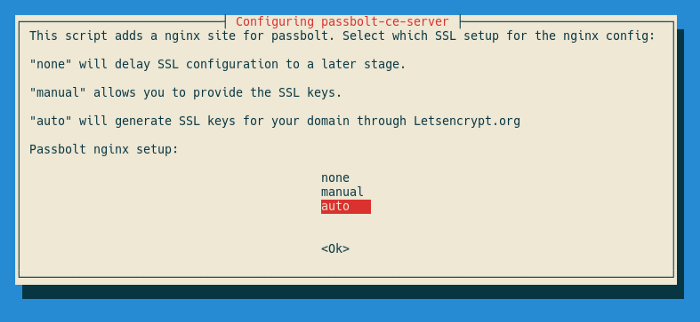
The next 2 screens will ask for the domain name and email address. Make sure the domain name points to your home router. For the email, you can use the Google Mail account we created earlier.
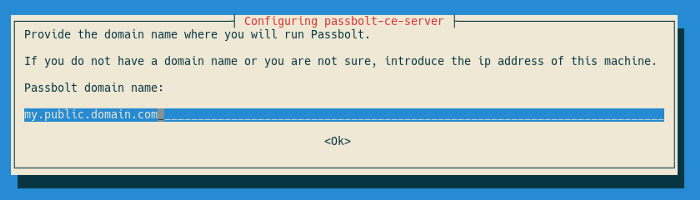
That’s it! You will notice some magic work from letsencrypt on your terminal. It is creating an SSL certificate for your domain, and changing nginx configuration accordingly. After that, you should be able to reach Passbolt safely at https://my.public.domain.com.
The Passbolt Debian package can be installed and configured automatically without user interactive attention, called non interactive mode. In the Debian packaging jargon this is called pre-seeding the Debconf Database.
This is very useful in the following cases:
This process can be automated both during initial installation, and configuration afterwards. For the sake of simplicity, we will repeat the process above Passbolt with https in non-interactive mode:
$ printf ‘passbolt-ce-server passbolt/mysql-configuration select No’ | debconf-set-selections
$ printf ‘passbolt-ce-server passbolt/nginx-configuration select true’ | debconf-set-selections
$ printf ‘passbolt-ce-server passbolt/nginx-configuration-three-choices select auto’ | debconf-set-selections
$ printf ‘passbolt-ce-server passbolt/nginx-domain string my.public.domain.com’ | debconf-set-selections
$ printf ‘passbolt-ce-server passbolt/nginx-letsencrypt-email string [email protected]’ | debconf-set-selections
$ sudo dpkg-reconfigure passbolt-ce-server
The result should be that Passbolt has reconfigured itself to use letsencrypt, without any screen interactive prompts to the end user. This facility works both for dpkg-reconfigure and apt-get install scenarios.
References
Article originally written by Albert Casals
3 min. read
We know, Installing passbolt is a quite hot topic. You just need to go in the community forum to realize

8 min. read
Starting with v2.13, Passbolt Pro Edition and Cloud now includes support for nested folders, to organize passwords and manage access rights in a simple yet flexible fashion.