Configure your email server settings
Sending a test email opens a connection from the passbolt server to the host and port you specify, and reports the result back to this screen. If the passbolt administrator and the system administrator are not the same person in your organisation, you should disable these endpoints once SMTP is configured, by setting PASSBOLT_SECURITY_SMTP_SETTINGS_ENDPOINTS_DISABLED to true. The healthcheck will remind you while they remain enabled.
Introduction
passbolt relies heavily on emails:
- Account creation
- Account recovery
- Notifications on different user actions
Having a working email setup is essential if you want to use passbolt at its best. There are many email providers and each one has its own setup process. The goal of this help page is to provide the basic concepts so each admin can setup their provider adjusting to their particular case.
Requirements
You can follow this procedure if you are meeting the following requirements:
- You are running Passbolt Pro > 3.8.0 or Passbolt Cloud
- You have an active administrator account
You are running Passbolt Pro < 3.7.3 ?
How does it work?
Configuring the email server through the UI is a feature introduced with passbolt v3.8.0 to help all administrators manage their SMTP server settings easily.
We moved the email configuration from config/passbolt.php directly into the database and your credentials are encrypted with the server GPG public key.
Access to email server configuration
In order to configure your email server configuration, select ⚙ > Organisation settings > Email server in the top right corner.
Choose your email provider
When you consult your email server settings for the first time, by default, the provider is Other. Everything is filled out except logins details. You are free to edit thoses fields to match your email configuration.
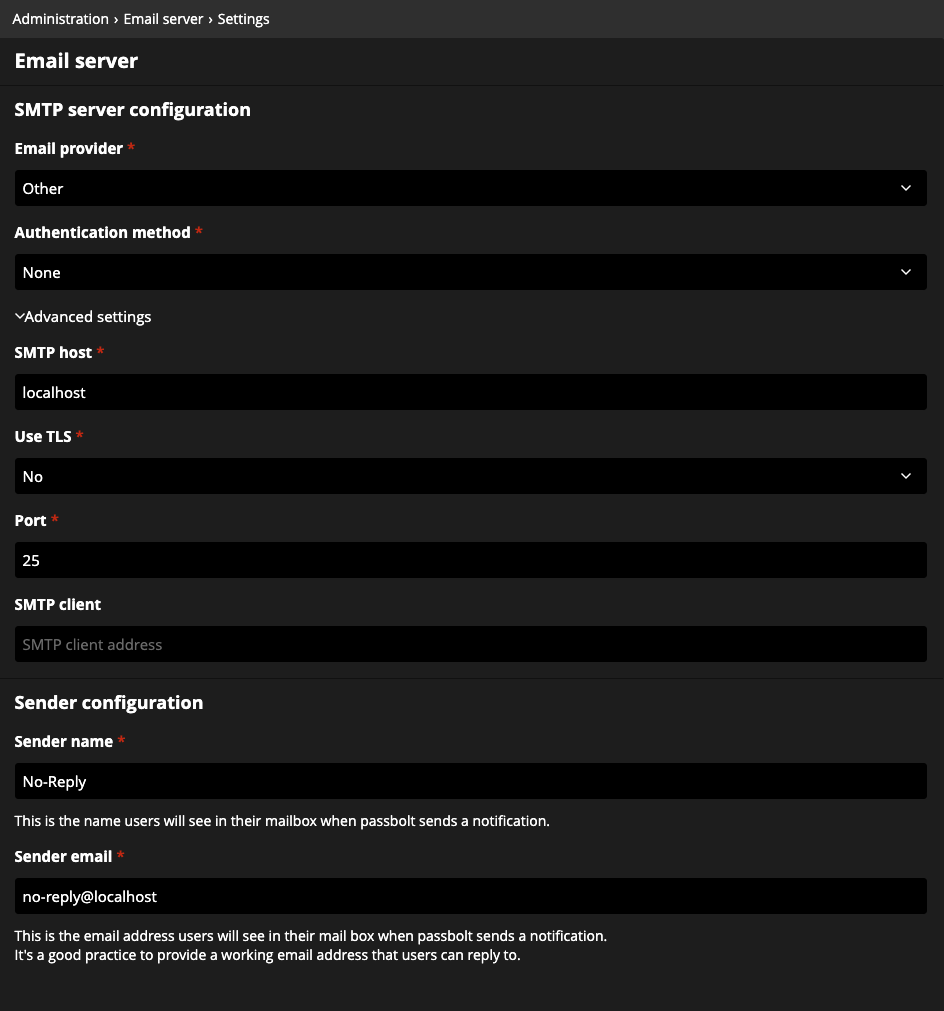
We also provide pre-filled configuration for the SMTP providers listed below.
But still, you can navigate through advanced settings to change all the setings like SMTP host, TLS, and port.
Configure email authentication with your SMTP provider

AWS SES

Elastic Email


Mailchimp

Mailgun

Mailjet

Microsoft Exchange
Office 365

Sendgrid

Sendinblue

Zoho

Others
Save the settings
To save the settings, you have to click on the save settings button.

If at least one mandatory field is empty or doesn't have the expected format, an error alert will appears and the interface jumps to the first mandatory field that doesn't fit the requirements. This field will also shows an error message in red.
Test email notifications
You can test your configuration by clicking on the send test email button. You must enter a valid recipient email to start the test procedure but the administrator current email is pre-filled.
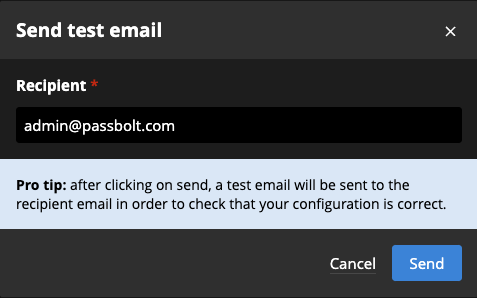
If the email has been successfully sent and you haven't received anything you should check your spam folder. The logs are also available in a text area if you unfolds the logs section.
The send test email button uses the values currently displayed in the form, even if they have not been saved. The notification emails your users receive are sent later by the email queue worker, which uses the saved settings, where settings stored in the database take precedence over environment variables and passbolt.php. So the test can succeed while queued notifications keep failing (or keep using old settings) when the form was tested but never saved, or when the database still holds an earlier configuration.
After a successful test, save the settings, then verify the saved configuration from the command line: passbolt send_test_email reads the settings the queue worker will use. See the email troubleshooting page for the commands.
Email digest
To avoid flooding inboxes during busy operations (an import, a large share, a group reshuffle), passbolt groups queued notifications before sending them. Notifications for the same recipient, triggered by the same user and belonging to the same kind of activity are combined:
- 1 pending notification is sent as a normal email.
- 2 to 10 pending notifications are combined into one digest email carrying each notification.
- More than 10 pending notifications are replaced by a single summary email telling the recipient how many changes happened.
Digests exist for resource changes, resource shares, group membership changes and removals, folder changes and passwords marked as expired. Other notifications, such as user invitations, are always sent individually.
The digest is enabled by default. You can disable it by setting the PASSBOLT_PLUGINS_EMAIL_DIGEST_ENABLED environment variable to false: every notification is then sent as an individual email. The emails are sent by the passbolt email_digest send command that the packaged cron job runs every minute; it processes up to 100 queued emails per run, configurable with the PASSBOLT_PLUGINS_EMAIL_DIGEST_BATCH_SIZE_LIMIT environment variable or the command's --limit option. When the digest plugin is disabled the same command keeps working and sends the queued emails without grouping.
Configure SMTP server using custom/self-signed certificate
With the v4.7 release, we have introduced support for SMTP servers using self-signed certificates.
You can set TLS (SSL) options in your passbolt.php or environment variables to specify your custom root CA certificate or skip verification (not recommended).
Allow self-signed certificate verification
// config/passbolt.php

return [
    'passbolt' => [
        ...

        'plugins' => [
            ...

            'smtpSettings' => [
                ...
                'security' => [
                    'sslVerifyPeer' => true,
                    'sslVerifyPeerName' => true,
                    'sslAllowSelfSigned' => true, // default = false
                    'sslCafile' => '/path/to/ca.crt'
                ],
            ],

            ...

        ],

        ...
    ],
];
Or, you can also use environment variables:
export PASSBOLT_PLUGINS_SMTP_SETTINGS_SECURITY_SSL_VERIFY_PEER=true
export PASSBOLT_PLUGINS_SMTP_SETTINGS_SECURITY_SSL_VERIFY_PEER_NAME=true
export PASSBOLT_PLUGINS_SMTP_SETTINGS_SECURITY_SSL_ALLOW_SELF_SIGNED=true
export PASSBOLT_PLUGINS_SMTP_SETTINGS_SECURITY_SSL_CAFILE="/path/to/ca.crt"
Skip TLS (SSL) verification
The approach of skipping TLS (SSL) verification is not recommended but can be useful if you want to test if you are able to connect to your SMTP server.
// config/passbolt.php

return [
    'passbolt' => [
        ...

        'plugins' => [
            ...

            'smtpSettings' => [
                ...
                'security' => [
                    'sslVerifyPeer' => false, // default true
                    'sslVerifyPeerName' => false, // default true
                    'sslAllowSelfSigned' => true, // default false
                ],
            ],

            ...

        ],

        ...
    ],
];
Or, via environment variables:
export PASSBOLT_PLUGINS_SMTP_SETTINGS_SECURITY_SSL_VERIFY_PEER=false
export PASSBOLT_PLUGINS_SMTP_SETTINGS_SECURITY_SSL_VERIFY_PEER_NAME=false
export PASSBOLT_PLUGINS_SMTP_SETTINGS_SECURITY_SSL_ALLOW_SELF_SIGNED=true
Configure SMTP with passbolt 3.7.3 or earlier version
SMTP with STARTTLS
If your email provider supports TLS encryption your setup should look like this in config/passbolt.php:
    'EmailTransport' => [
        'default' => [
            'host' => 'your.smtp.provider.host.com',
            'port' => 587,
            'username' => 'user',
            'password' => 'secret',
            'tls' => true,
        ],
    ],
You should replace:
- your.smtp.provider.host.com
- user
- secret
With the actual values for your provider. Usually email providers that support STARTTLS use port 587, however you should check with your provider's specific requirements. Note that port 25 also supports STARTTLS.
SMTPS (implicit TLS)
Some providers support implicit TLS encryption and the setup is slightly different from the STARTTLS case. Just change
your config/passbolt.php file to look like this:
    'EmailTransport' => [
        'default' => [
            'host' => 'ssl://your.smtp.provider.host.com',
            'port' => 465,
            'username' => 'user',
            'password' => 'secret',
            'tls' => null,
        ],
    ],
All the changes are the same as the TLS providers except that you will set tls to null and replace placeholders with the actual values for your provider.