
3 min. read
Passbolt Helm Chart Now Supports PostgreSQL
Our Helm Chart now supports PostgreSQL!
10 min. read

This blog post is a tutorial about how to configure an SSO connector on your Passbolt instance using Keycloak as a provider.
We will assume on this tutorial that you don't even have a Keycloak instance running and your Passbolt instance is not set to accept such a provider yet.
So we can see all the traps we can find in our way and how to solve them.
In order to set everything up, you must ensure that for your Passbolt instance:
Note that this guide is not applicable for Passbolt cloud instances.
To have a more complete overview, we assume you want to access your Keycloak instance via a domain name and that it can't be resolved by your Passbolt server as-is.
Let's assume you don't have Keycloak yet, so one of the first steps will be to set up a Keycloak instance. Again, for simplicity, docker will be used
You can create a `docker-compose.yaml` file with the following content (please don't spin the containers just yet!):
version: '3'

volumes:
  postgres_data:
      driver: local
  keycloak_data:

services:
  postgres:
      image: postgres
      volumes:
        - postgres_data:/var/lib/postgresql/data
      environment:
        POSTGRES_DB: keycloak
        POSTGRES_USER: keycloak
        POSTGRES_PASSWORD: password
  keycloak:
      image: quay.io/keycloak/keycloak:latest
      environment:
        KEYCLOAK_ADMIN: admin
        KEYCLOAK_ADMIN_PASSWORD: admin123
        KEYCLOAK_LOGLEVEL: INFO
        ROOT_LOGLEVEL: INFO
        KC_HTTPS_CERTIFICATE_FILE: /opt/keycloak/conf/server.crt.pem
        KC_HTTPS_CERTIFICATE_KEY_FILE: /opt/keycloak/conf/server.key.pem
      ports:
        - "8081:8080"
        - "8787:8787"
        - "8443:8443"
      command:
        - start-dev
        - --features admin-fine-grained-authz
      volumes:
        - keycloak_data:/opt/keycloak/data
        - ./domain.crt:/opt/keycloak/conf/server.crt.pem
        - ./domain.key:/opt/keycloak/conf/server.key.pem
You might have noticed the need for domain.crt and domain.key in the setup.
These files are crucial for enabling HTTPS on Keycloak, a security must-have for Passbolt integration. Unlike some systems, Keycloak doesn't automatically manage these SSL certificates, meaning a bit of DIY is in order. Don’t worry if SSL sounds daunting – we're here to guide you through it. Remember, your domain name, like our example keycloak.passbolt.local, can be customised. Just ensure consistency across your setup.
authorityKeyIdentifier=keyid,issuer
basicConstraints=CA:FALSE
subjectAltName = @alt_names
[alt_names]
DNS.1 = keycloak.passbolt.local#!/bin/sh
openssl req -x509 -sha256 -days 2000 -newkey rsa:2048 -subj "/C=LU/ST=Luxembourg/L=Esch-Sur-Alzette/O=Local CA/OU=Local CA/CN=My RootCA" -nodes -keyout rootCA.key -out rootCA.crt
openssl req -newkey rsa:2048 -subj "/C=LU/ST=Luxembourg/L=Esch-Sur-Alzette/O=Keycloak local/OU=Keycloak local test/CN=keycloak.passbolt.local/" -nodes -addext "subjectAltName = DNS:keycloak.passbolt.local" -keyout domain.key -out domain.csr
openssl x509 -req -CA rootCA.crt -CAkey rootCA.key -in domain.csr -out domain.crt -days 365 -CAcreateserial -extfile ssl_gen_config.txtNOTE: If you want to change this file, ensure that both `CN` values are different. It could be a problem for later if they are matching.
With both files created with their content, you just have to do:
./createSslKeys.shThe necessary file for SSL will be generated in the same folder as you are currently. You can then run your Keycloak instance with a:
docker-compose -f docker-compose.yaml upYou can wait a bit for the server to finish starting. After that, in a browser you can try to go on your Keycloak domain to make sure you can access it (with the current configuration, the address is https://keycloak.passbolt.local:8443)
At this point, your browser should give you a message saying that the SSL certificate is not secure. It's expected as with the previous commands, you had generated your own and your OS is not set to trust it. It's not a problem for your browser, you can just "take the risk" (because it's your own certificate, not an unknown one!).
However for your Passbolt instance, it will be a problem as it will refuse to communicate with Keycloak. We will fix that a bit later in this tutorial, for the moment we will focus on Keycloak configuration.
Access your Keycloak instance via the configured URL (in this example https://keycloak.passbolt.local:8443).
The credentials are present in the docker-compose file (it's `admin` + `admin123` here, and please, don't use that in prod 🙏, thank you).
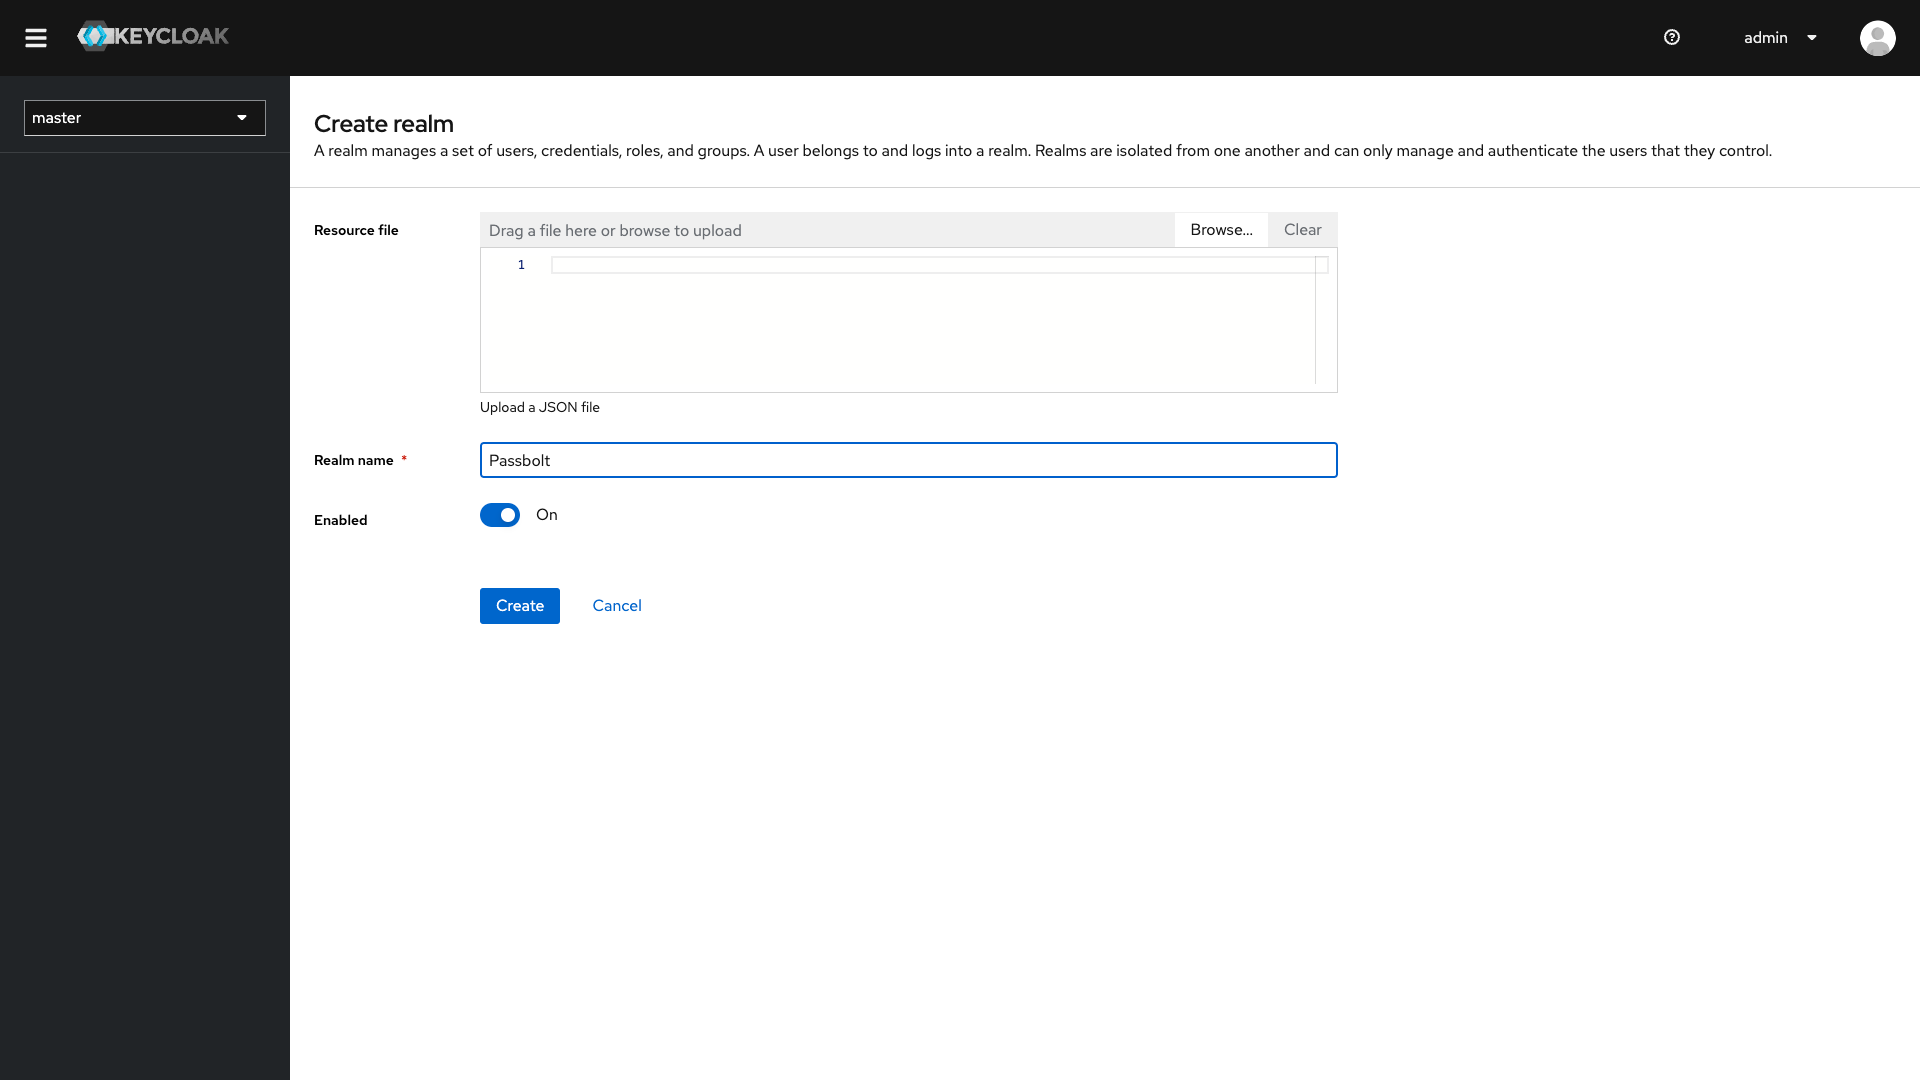
Once signed in, you'll need to create a new realm for your SSO connection.
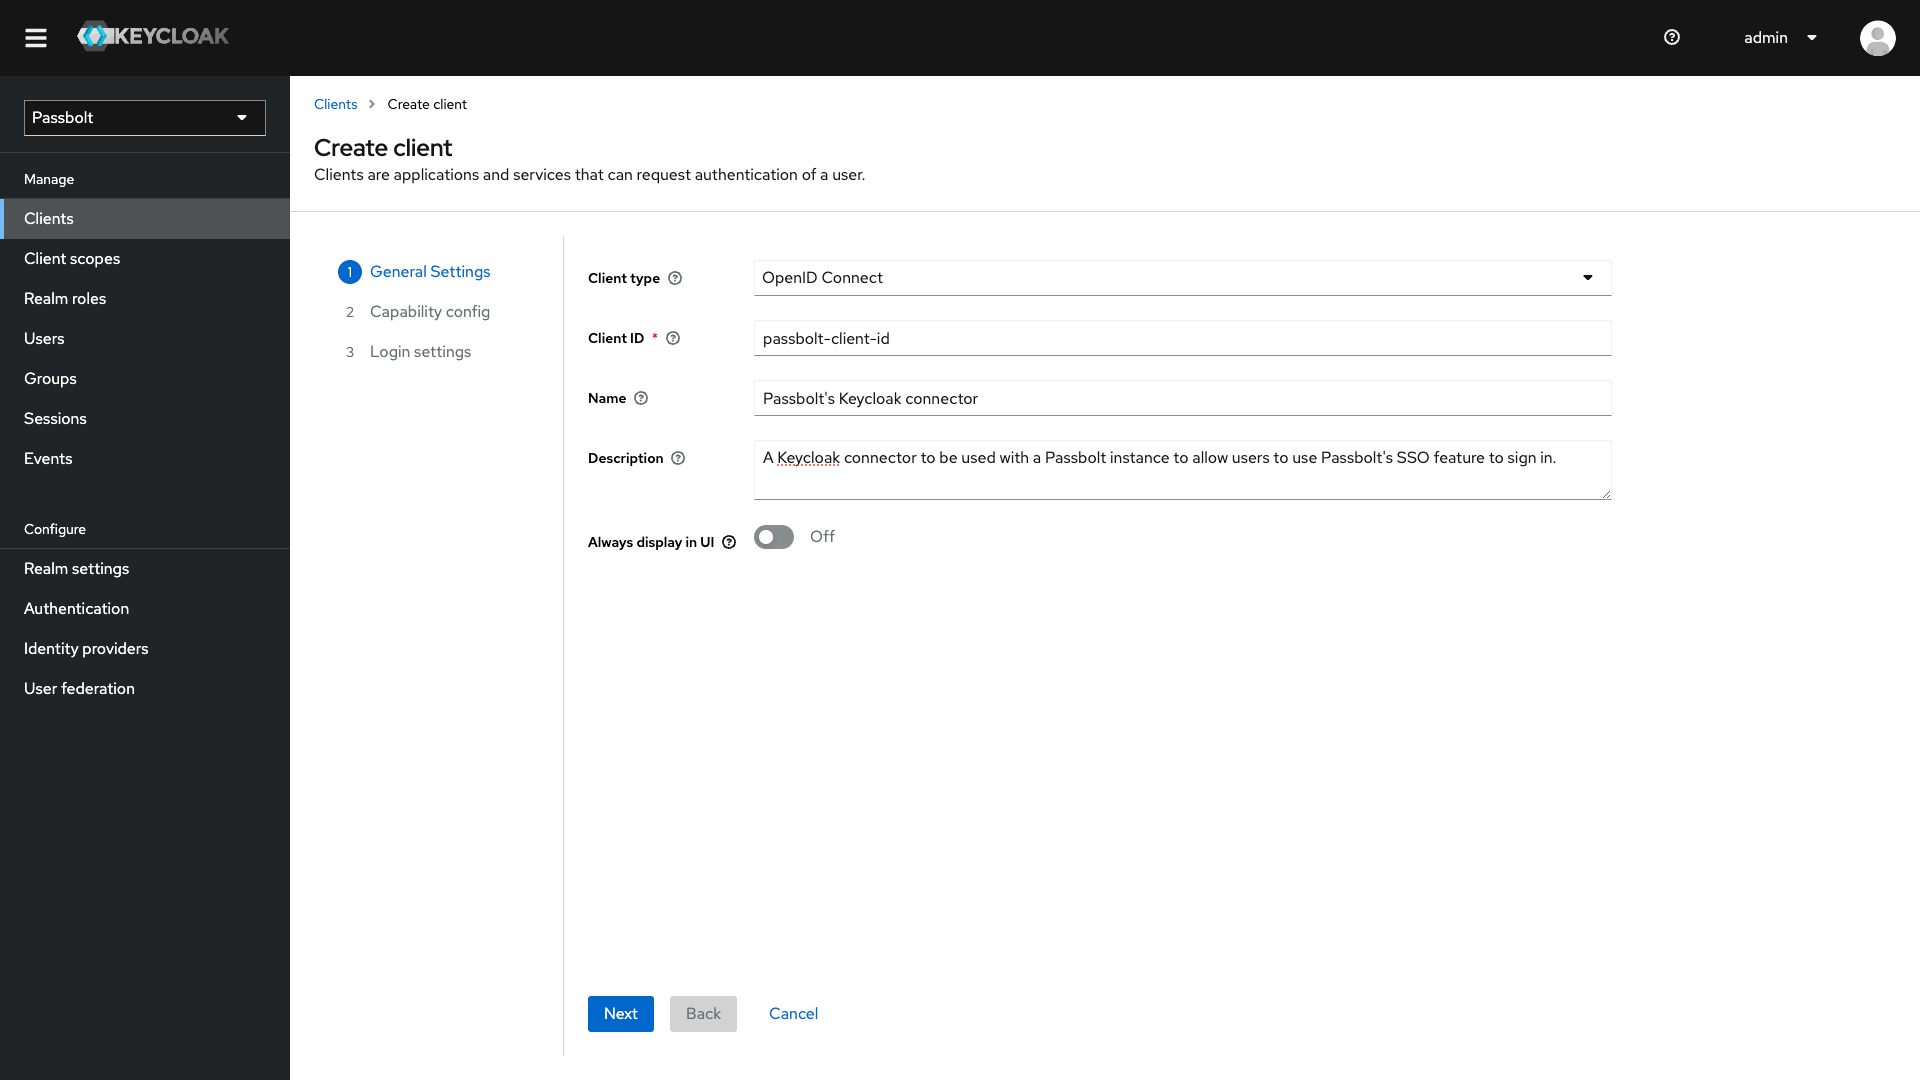
For the you need to:
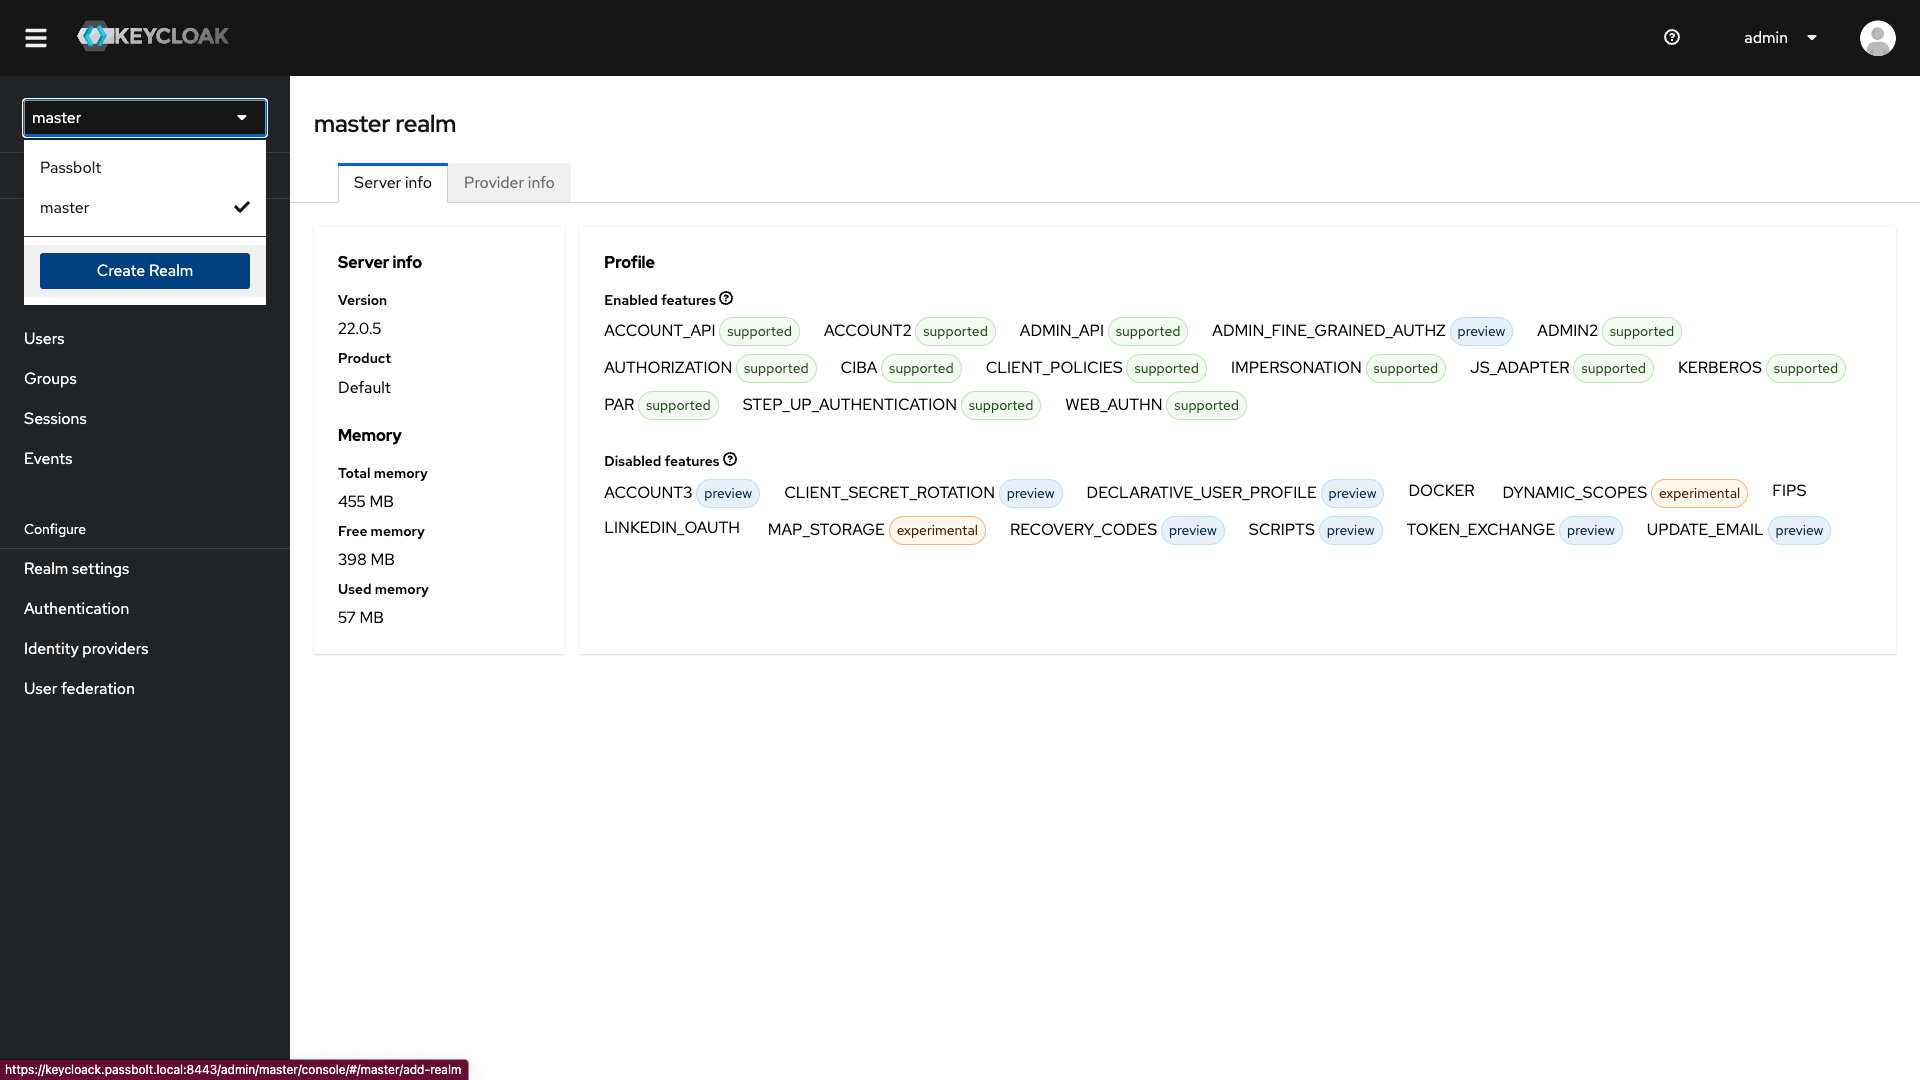
Choose a realm name (we will use Passbolt in the example) and ensure the enabled is set to On.
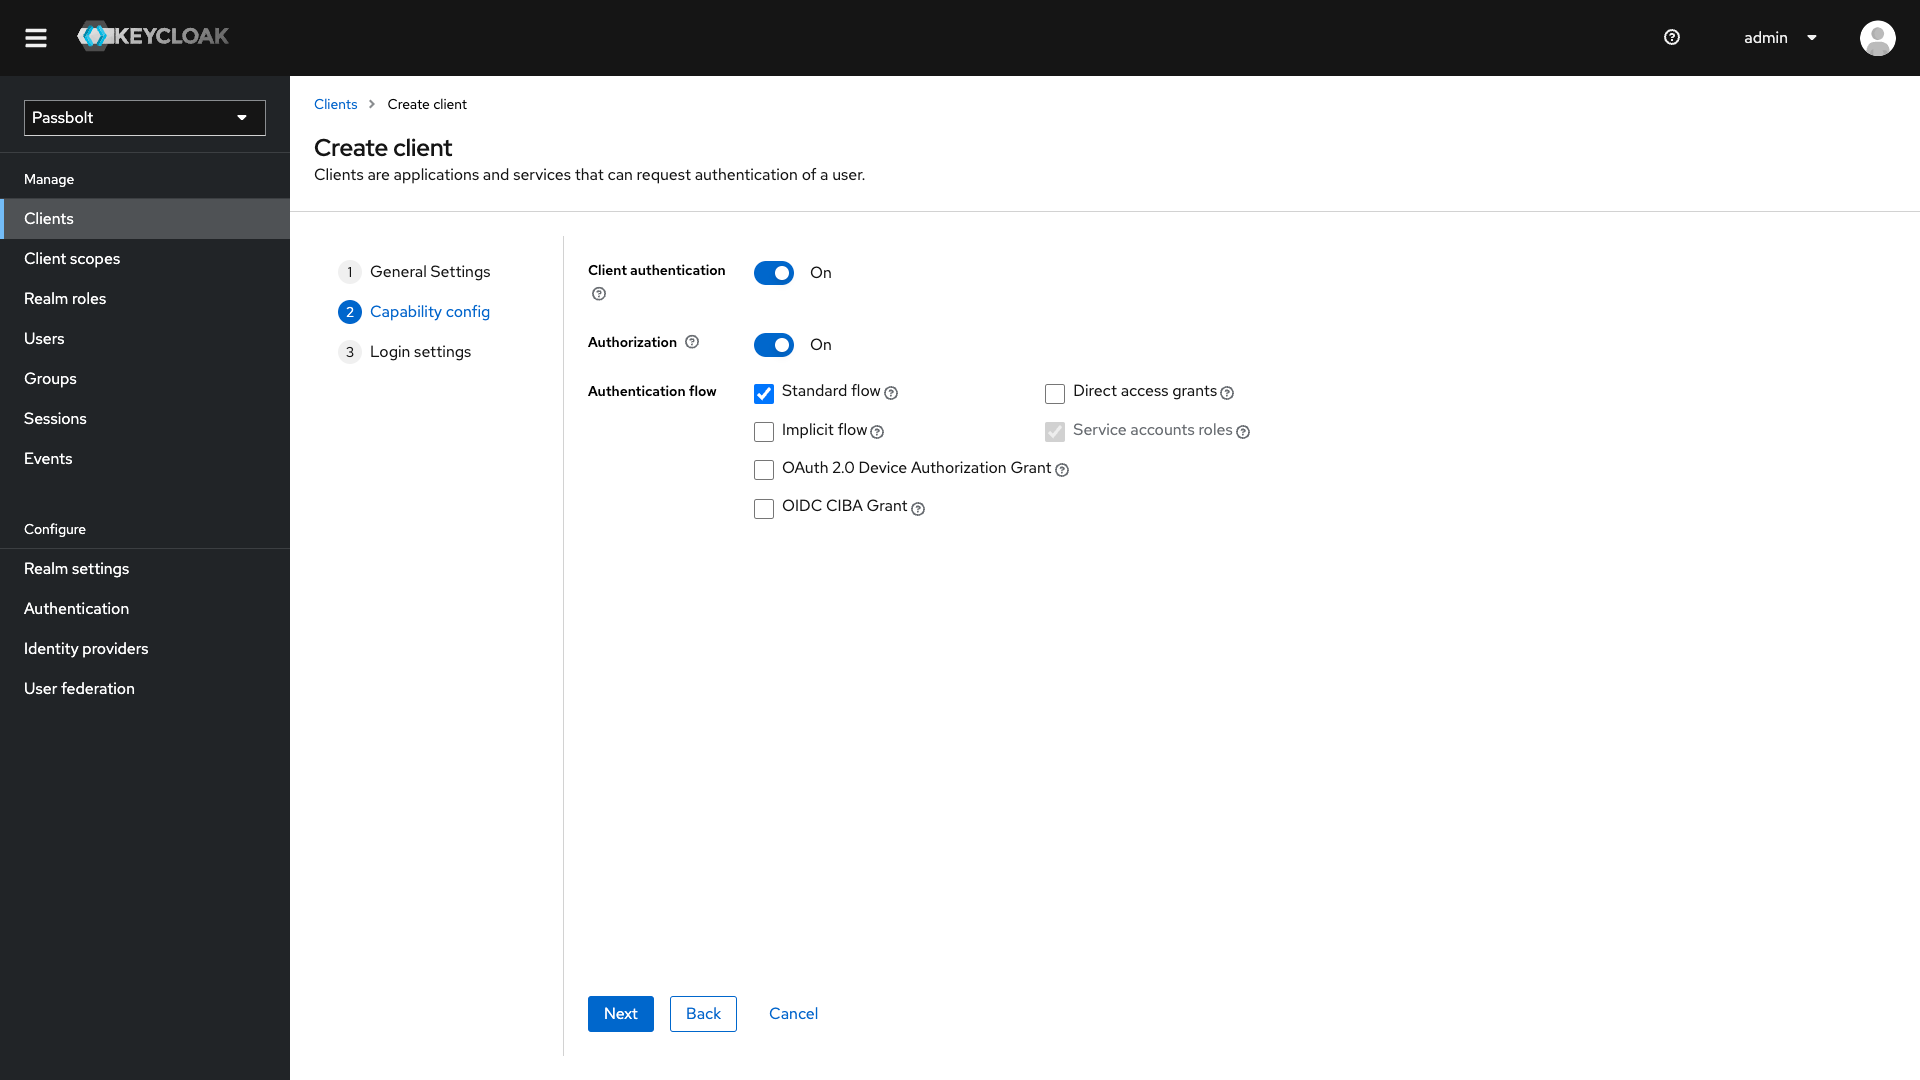
Your new realm and client are now available for usage. However there are still no users yet, so nobody can sign in to your Keycloak instance.
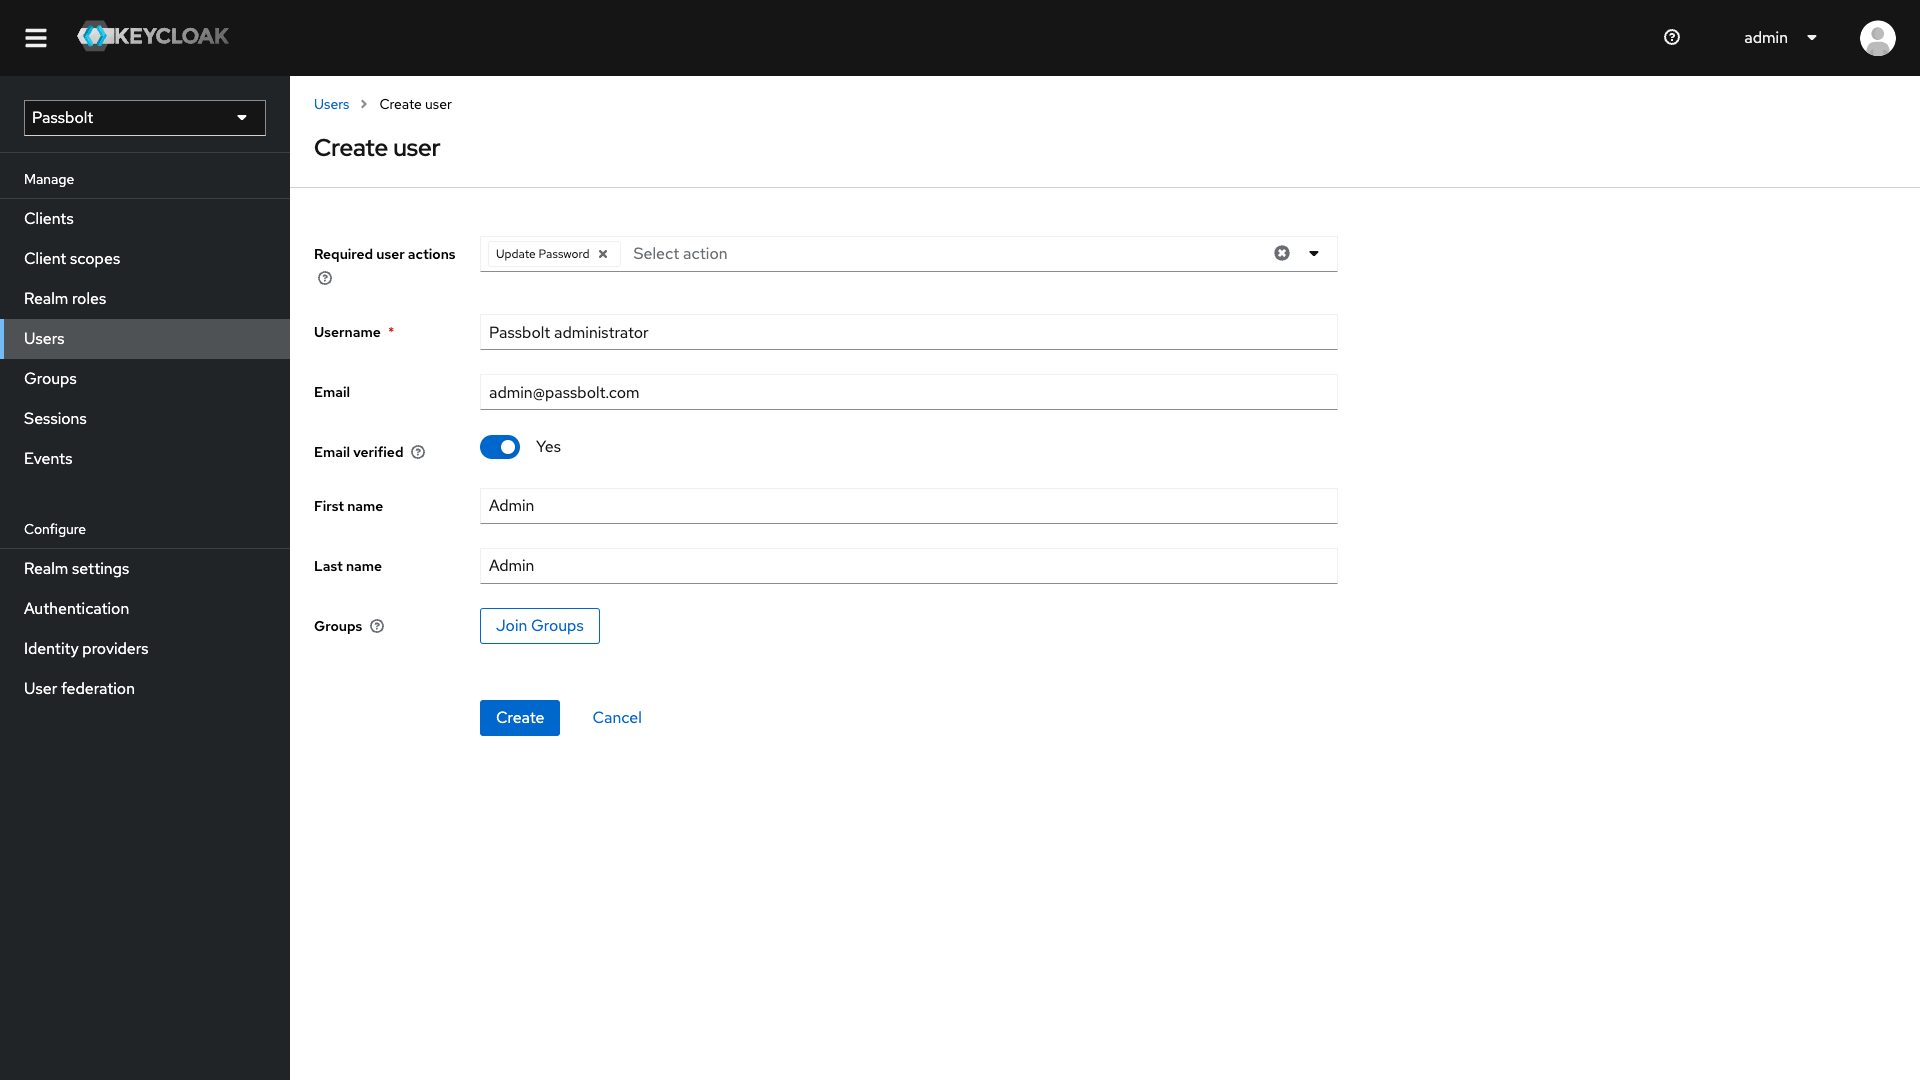
During the process of setting the SSO configuration on Passbolt, you will be prompted to do a log in test (this ensures that a wrong configuration is not set up on Passbolt). However, SSO login is successful only if the username of the Passbolt user matches the email of the Keycloak user. With that in mind we can create our first user on Keycloak and its email address has to match our Passbolt admin user’s username (or email if you prefer).
On the left menu click on Users and then create a new one:
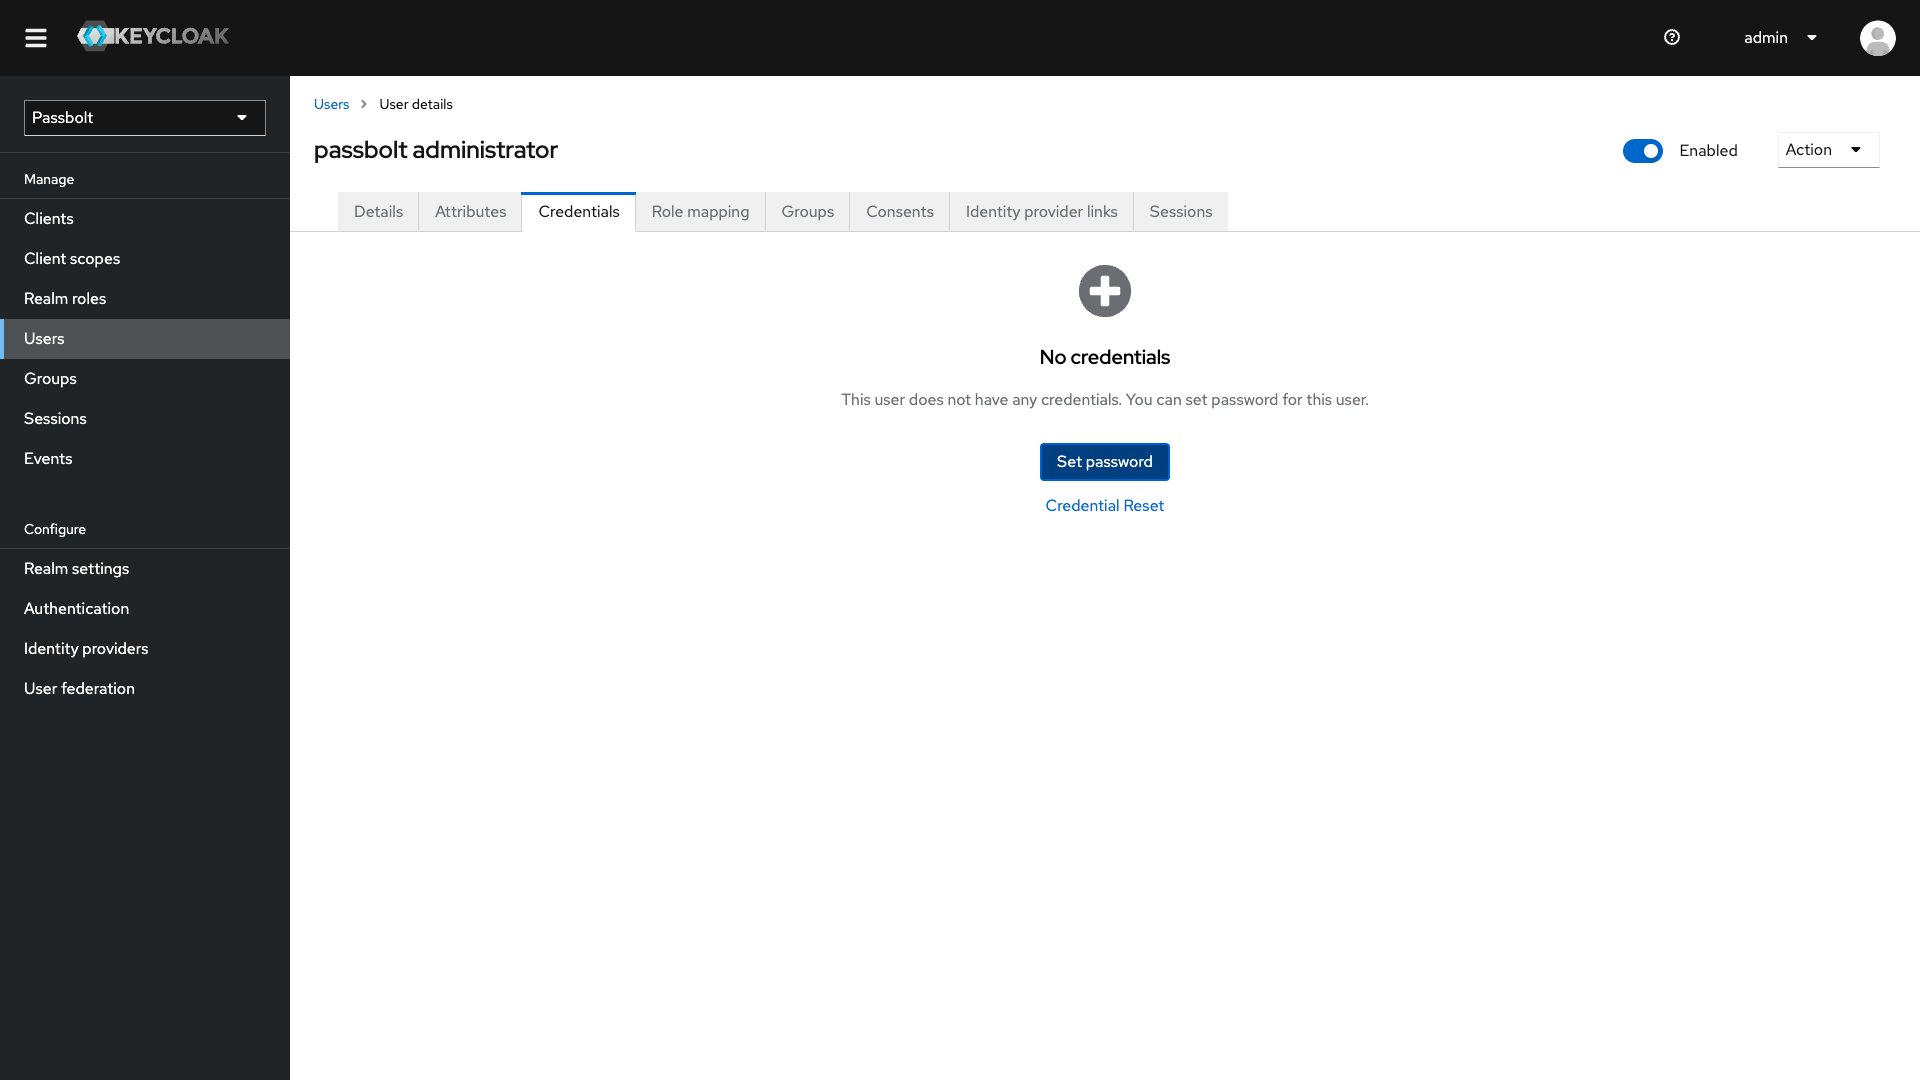
The user is created however, it still can’t sign in as no password has been defined for it. In order to fix that: go on the user list and click on the newly created user. In the page select the tab Credentials and add a new one.
At this point, you’re almost set on the Keycloak side. Only remains to set the authorised URLs, but to know it, we will need first to go on the Passbolt administration settings.
There are different things to be done. Some, on the server to allow communication between both Passbolt server and Keycloak server, and the SSO settings of Passbolt itself.
You have a custom domain name that is not registered in any DNS maybe? It's not a problem as long as the server knows about how to resolve the domain name.
For that, go on your Passbolt server via a terminal and edit the file /etc/hosts to add a line like the following:
127.0.0.1 keycloak.passbolt.localYou will need to change the 127.0.0.1 part to match your Keycloak server's IP.
To check if the configuration is updated and see if your Passbolt server can reach your Keycloak server, just go for a ping:
ping keycloak.passbolt.localIt's important that you find the right IP in the console output and that you see that the request reached Keycloak and it responded.
If it's not the case, you should fix this now otherwise you will be blocked for the next steps at some point.
You have your own root certificate authority right? Well, your server OS will not trust it until you configured it for that. When the SSL files have been generated, the first step in the commands was to create a certificate authority to sign the Keycloak server's key.
That root certificate needs to be trusted on your Passbolt server.
For that you will need to copy the rootCA.crt from where you generated it to the Passbolt server. Once the certificate is on the server you can follow some procedures for trusting it.
Notice that it strongly depends on your server and its OS so it's not possible to provide a full list of processes to follow. You can search for it on the Internet, you'll find a lot of information about that.
However, let's with at least an example that has been used in this tutorial (for a Debian OS):
# The certificate file has to be placed in `/usr/share/ca-certificates` folder or subfolders to be detected
mv rootCA.crt /usr/share/ca-certificates/rootCA.crt

# Update the list of trusted certificates
sudo dpkg-reconfigure ca-certificates
On the second command execution, you should have a terminal UI asking if you want to update the trusted CA certificates or not and how (auto or manual).
Choose ask in the options and you'll see a list of detected certificates. Find your rootCA.crt file in the list, it should be unchecked at this state, make sure it's checked and validate this step. Your certificate is now trusted and you should be able to communicate with Keycloak from your Passbolt server.
A quick check to confirm that doesn't hurt so, you can give a test from your server terminal:
curl -s -o /dev/null -v https://keycloak.passbolt.local:8443You should not see any SSL certificate problem. If it's the case, then there is a problem with the certificate and it could be:
With this set, you have actually both of your servers able to communicate together. Now, the last step is to configure Passbolt itself.
→ We assume that to change a config file of Passbolt, you're using a terminal, if you have another way, adapt this part according to your tools.
Using a terminal, connect to your Passbolt server if it's not the case already. Depending on your OS, the file might be located elsewhere, but usually, it's the file /etc/passbolt/default.php.
Locate the text env('PASSBOLT_PLUGINS_SSO_PROVIDER_OAUHT2_ENABLED', false) and change the value false to true. Save the changes and you're good to go with this SSO provider on Passbolt.
A second possibility is that to make sure that the server starts with the environment variable PASSBOLT_PLUGINS_SSO_PROVIDER_OAUHT2_ENABLED set with true.
Everything should be set up so far except the Passbolt administration settings and the authorised URL on the Keycloak side.
For that:
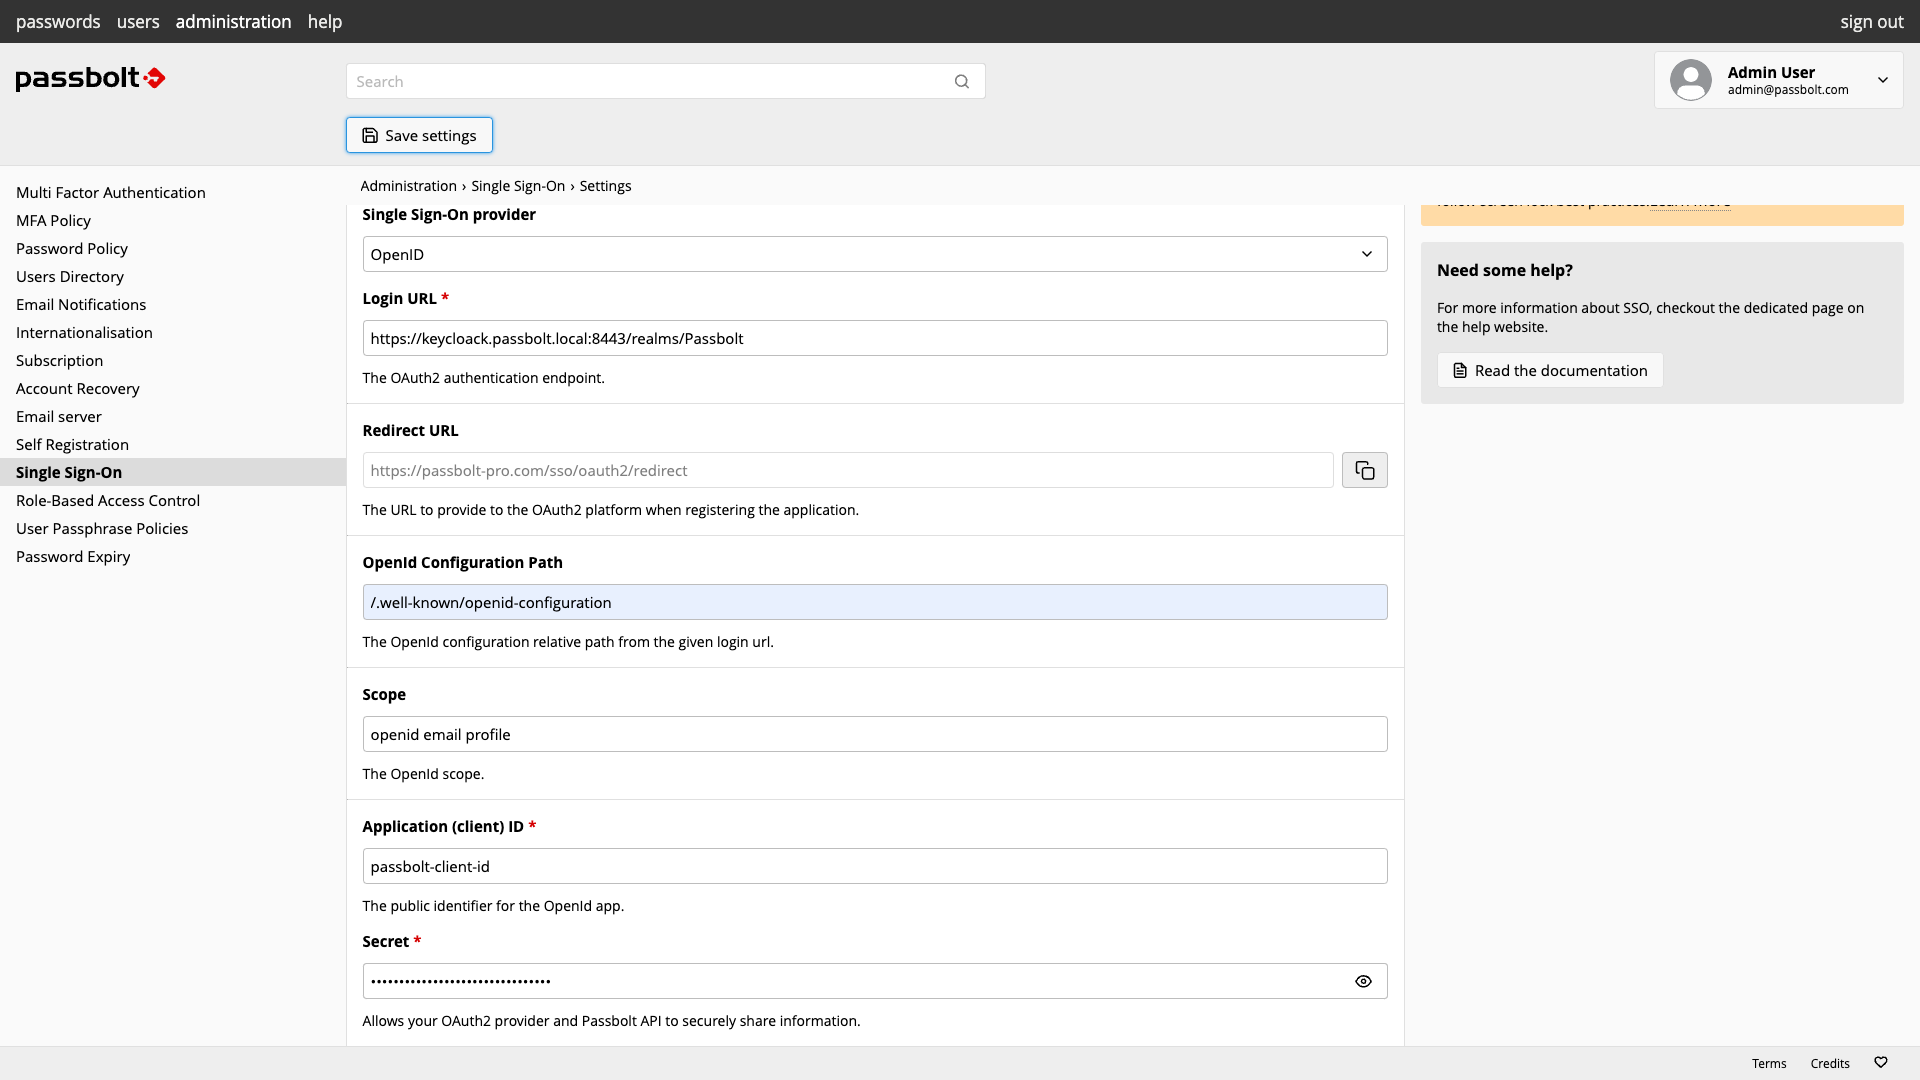
Here's an example of what is expected as a configuration:
→ Assuming, the realm is named Passbolt and the Keycloak instance is available at https://keycloak.passbolt.local:8443
So now, you have:
You can Sign in to Passbolt with Keycloak in just one click 👏👏👏!
3 min. read
Our Helm Chart now supports PostgreSQL!
4 min. read
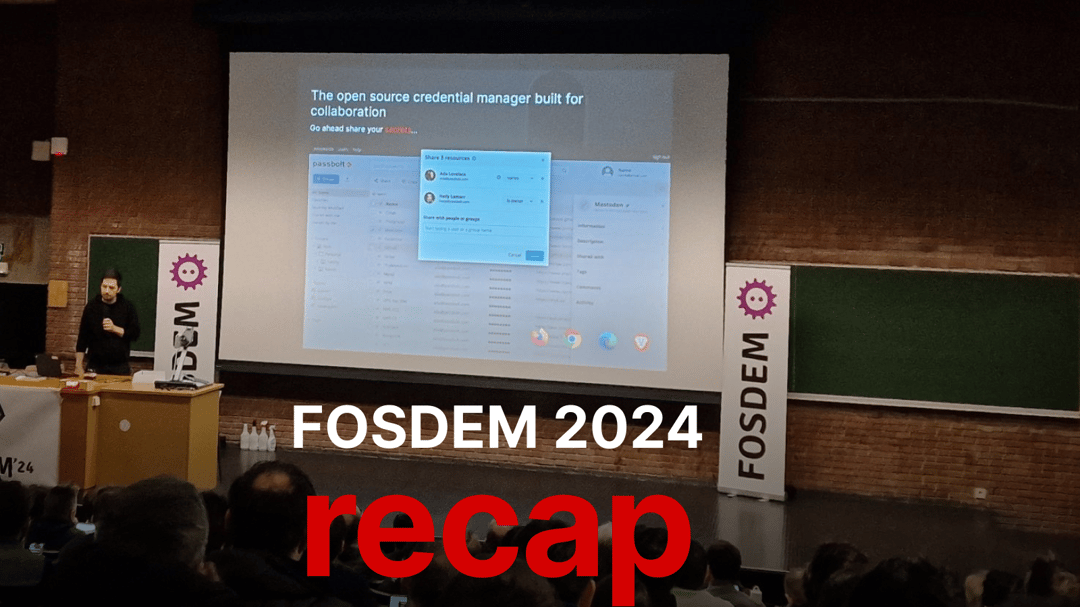
At FOSDEM 2024, the Passbolt team not only connected with the open-source community but also shared insights on the future of authentication technologies through engaging talks. Join us in exploring the event's highlights and our team's key takeaways.